Google Website Translator Gadget

Tuesday 31 July 2012

Hungarian Rings / Rubik's Rings

In the past I never really had any luck solving '2D Sequential Movement' type puzzles, so I tended to stay away from them. Recently however I saw this as a bit of a shame, so decided to give them another chance. This time I had much more success!

I thought I'd write about these two puzzles specifically as they are some of the most well known puzzles from the genre. And the reason I'm writing about them together is because they are different takes on what is essentially the same puzzle.

This first one is called the Hungarian Rings, and according to Jaap's page the design has been around since 1893, so it's definitely one of the classics.

The puzzle consists of two intersecting rings which are made up of 38 balls in four different colours. The picture on the left shows it in the solved state.

The balls can be scrambled by rotating the balls in their ring shaped tracks, balls can then be moved from one position to another at either of the two intersecting points where the two rings come together.

I was actually quite impressed with myself when I managed to get all of the balls in the right place apart from four which needed to swap places. However I was stuck at this step for another couple of days! The real challenge of this puzzle comes from moving the last balls into their correct positions.

After a couple of days I worked out a system to solve the last pieces, and was thrilled! Especially considering how miserably I failed the first time I tried this type of puzzle.


This other puzzle is a variation on the theme of the Hungarian Rings, and these were made by Rubik's under the name of Rubik's Rings, made in 1999 by a company called OddzOn. I don't think anywhere actually sells this puzzle any more, so I found my copy on eBay.

As you can see it is essentially the same as the Hungarian Rings, except with a couple of glaring differences;
Firstly the puzzle isn't flat, it's skewed at the intersections. This doesn't affect how the puzzle works, it just makes it look a bit funkier.
Secondly there are only three colours of balls
rather than four. And lastly, there are only 34 balls as opposed to 38.

Because of the lower number of balls and less colours I found this one to be easier to get to an 'almost solved' state than the Hungarian Rings. Then the final moves can be done in the same way as the first puzzle.

The only problem I found with this puzzle is that OddzOn built in a ratcheting type mechanism to hold the balls more precisely, presumably to stop the balls from misaligning at the junctions and jamming, although I kind of found that this seems to do the exact opposite. I really had to line each ring up exactly in order to spin them round. Not great if you fancy going for a quick solve time.

So I'm glad I decided to give this genre of puzzle another try. I think I just didn't try hard enough to solve them the first time round, but honestly, with a bit of thought and determination I reckon anyone could solve these two puzzles in a reasonable amount of time.

The Hungarian Rings are available from Puzzle Master, however like I said the Rubik's Rings aren't (as far as I'm aware) commercially available any more, so keep an eye out on eBay as I think they come up pretty regularly.

Wednesday 25 July 2012

Pentacle Puzzle (David Pitcher)

For quite a while now I've been looking backwards and forwards through Shapeways for a puzzle to buy. For those of you who don't know Shapeways is a 3D printing company based in the US who give people the opportunity to see their 3D designs brought to life in a relatively short space of time. They don't specialise in puzzles, but many puzzle designers are sing them as a platform from which to sell their designs to the world. They come up with the designs, Shapeways prints them, puzzlers buy them, everyone's a winner!

The catch with 3D printing at the moment is that it is still quite expensive compared with mass produced moulded puzzles, for obvious reasons. This is why I browsed the site for so long trying to choose a puzzle to buy. I wanted a puzzle that was no only good fun, but it also had to look good, be easy to assemble and -most importantly- be affordable.

After much pondering I decided on a twisty puzzle called the Pentacle Puzzle designed by David Pitcher. It ticked all of the boxes, and looked simple enough for me to assemble myself. A little while after placing my order (a week or two) a packet showed up at the door.


Yep, that's a load of puzzle parts in some bags. Shapeways are a printing company, they don't assemble the parts for you. The M3 screws you see in the picture were also ordered separately from eBay.


Here are the different parts laid out. Normally with a puzzle of this type it would be necessary to add coloured stickers in order to make this into a puzzle. After all, without the colours there wouldn't be anything to solve.

With this puzzle however the colour parts you can see on the right have been printed in a material called 'full-colour sandstone'. They aren't printed out and then dyed afterwards to look like this, they actually come out of a printer looking like that! I find that absolutely incredible!

The main body of the puzzle is made from the standard 'black strong and flexible' plastic material, then the coloured sandstone chips can be pressed into the hollows in the black pieces. This gives the puzzle a  really nice original look rather than the usual stickers, plus it gives a nice bit of extra weight to the puzzle for a quality feel.

I did have to sand down some of the colour chips with my Dremel in order to get them to fit into their black pieces, but this wasn't too much bother. I told David about it afterwards and he said he'd tweak the measurements to make assembly a bit easier on the hands.

So the first part of the assembly was to put together the twelve black pieces that make up the main body. This wasn't any fuss at all.
Once all of the pieces were together I closed it up using the 12mm M3 screw I ordered ready for the arrival of this puzzle. I tightened the screw till the fit and movement of the pieces felt just right, and spent the next 10 minutes or so just turning all of the moving parts to wear them in a little bit.

Anything printed in the 'strong and flexible' material will have a rough sort of finish to it. This feels nice on the outer parts of the puzzle but also causes unnecessary friction on the inner pieces. Just by turning the pieces round a bit you will grind some of this material away, making the movements much smoother in the process. If you really wanted to you could sand it perfectly smooth, but that's down to personal taste.

Now with the main body assembled and worn in I went ahead and started to add the coloured pieces into their respective slots. As I said, I did have to sand some of them down to fit perfectly, but no glue was needed to keep them in. Needless to say I'm confident that those pieces are never coming out again.

Each side of the puzzle is a mirror image of the other, so I just had to pay special attention to get them all in the right places, which wasn't too difficult. And after a few minutes I ended up with a brilliant looking and fully functional puzzle!

As a puzzle it is a Pentagonal Floppy Cube, as it can rotate about all of the five points. Not too difficult, but also because of the colour pattern it isn't simple either.

So as my first ever order from Shapeways I am very happy! I will most definitely be ordering more in the foreseeable future. Hopefully the price will eventually come down a bit, and that will make these kinds of puzzles more available to everyone.

Check out Pitcher Puzzles for more of David's excellent designs. And also have a browse through some of the other things Shapeways has to offer. There are so many very cool designs on there, and not just for puzzles either!

Tuesday 10 July 2012

Karakuri Small Boxes


The Karakuri Creation Group make some seriously incredible puzzle boxes, a few of which I have written about before. Many of them also come with a pretty hefty price tag to match their beautiful craftsmanship, however they do make a series of smaller than usual puzzle boxes that due to their size are also much cheaper.


They are all part of the Karakuri Small Box series which is made up of eight separate boxes, all of which have very different opening mechanisms despite their similar appearances. They all have unimaginative names, but at least it makes it easy to distinguish that they are part of a series.

I'm going to try and go through now and write a little bit about each of them, it won't be too much as they are all relatively simple (only a few steps each) and I don't want to give away their solutions.


Karakuri Small Box No.1

Solve Time = ~5 Minutes
Move Count = 3

The first box in the series has a walnut exterior with a lovely multi-wood inlay of the Karakuri logo. You'll notice that this logo inlay features on all but one of the Small Boxes. No.1 requires only three moves to open and the mechanism is very simple. The craftsmanship on these boxes really is incredible, you can barely see the joins where each wooden panel meets another, and this is one of the things that add difficulty to them. Personally I enjoy simple mechanisms, so this was great. The mechanism was a little stiff on my copy which is likely due to the humidity in my house at the moment, which shows how tight the tolerances are in these boxes.

Karakuri Small Box No.2

Solve Time = ~4 Minutes
Move Count = 2

At first glance No.2 obviously differs from the first in both size, shape and colour. This one is longer, and the outer panels are made from a lighter cherry. The solution technically requires two moves, but as one of those moves is pretty unconventional I wouldn't class it as very easy at all. The only reason I managed this one so quickly was because I had come across this mechanism before, but it had me stumped for a decent while before I finally got it. A very fun puzzle! I just gave it to my fiancée who also managed to open it in only a few minutes.

Karakuri Small Box No.3

Solve Time = ~3 Minutes
Move Count = 4

No.3 looks very similar to No.2, except the box is slightly wider and made from a nice recognisable oak. It has one of the higher move counts in the series at four moves. The first two moves come very easily, but the third is a bit different and may just trip you up if you're not paying attention. The moves on this one have to be done fully at each step otherwise the next move won't be possible and you might miss the solution. I'd recommend this one just for the unusual third step.

Karakuri Small Box No.4

Solve Time = ~4 Minutes
Move Count = 1

No.4 is the first significantly different puzzle box in the series so far, this is because of the fact that it has an obvious base as opposed to the others which have all equal sides. The outer panels of this box are made from a lovely red coloured wood called rengas, and it is my favourite wood colour in this series. Although it's one of my favourite looking boxes in the series, it is also my least favourite box in terms of its solution. It's only one move and I found it rather underwhelming. I've seen this trick used before in another box by a member of the KCG, and I have to say that I didn't like it then either. It's just not elegant enough for my liking.

Karakuri Small Box No.5

Solve Time = ~15 Minutes
Move Count = 3

No.5 is exactly the same size and shape as No.4, but it is made from the lightest wood in the series, maple. It also has an obvious bottom side like No.4. Personally I found this one to be the hardest box in the entire series taking me a good 15 minutes to solve it. I probably opened it the first time in less than 10 minutes, but it did take me the extra time to work out how to solve it reliably every time. It turns out that it is possible to solve this box with unintended solutions quite easily, but I'll say now that you do not need to tap or hit this puzzle at all to solve it. If you stay away from excessive force you're likely to find the proper solution first.

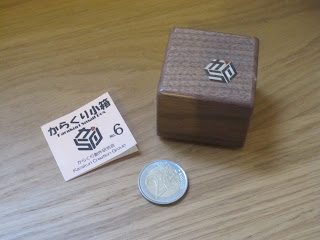
Karakuri Small Box No.6

Solve Time = ~3 Minutes
Move Count = 2


No.6 is once again the exact size and shape as both No.4 and No.5, with the obvious square base and this time the outer panels are made from a nice dark walnut. I do love walnut, but I found it a bit of a shame that they made the wood type the same as No.1. Although in fairness various wood versions of these puzzles have been made, so I could just get a different version of No.1 if I preferred. The solution to this puzzle should be easy to most amateur puzzlers, it may just take a little while to get the solution just right to be able to open the box. While the solution is very familiar the actual implementation is different from the norm. It's worth solving this with the lid off just to see if you notice why it's a little bit special.

Karakuri Small Box No.7

Solve Time = ~2 Minutes
Move Count = 3

The wood choice for No.7 is teak, and you'll notice that it is visibly different from all of the other boxes in that its logo is not made from inlaid wood, but rather it has been branded on instead. Many people don't like this look, but personally I like the simplicity of it and don't think it detracts from the puzzle at all. It reminds me of how Mr. Makishi signs his puzzle boxes. This isn't very difficult as the mechanism is much closer to the traditional Japanese style, but it is my favourite because of how simple and elegant it is. Pretty much anyone should be able to open this box, which makes it my first choice when starting a person off with their first 'trick' puzzle box.

Karakuri Small Box No.8

Solve Time = ~5 Minutes
Move Count = 2

I think it's safe to say that No.8 is the odd one out in this little series of puzzle boxes. It is completely different from the others in several ways. Although it is symmetrical, it does not have even sides, you can see two wood colours on the outside (keyaki and walnut) rather than just the one and also it has no visible logo. I'm not a fan of this box being in the Small Box series purely because of how different it does look. I quite like puzzles in a series to visibly relate to each other, and while the other boxes differ in subtle ways it is still obvious they are part of a set. This however is very far removed from the others. 

No.8 was actually designed by Akio Kamei and used as an exchange puzzle at IPP16 under its original name 3D Box. As a puzzle it again isn't very difficult, but I do like the solution. It has a very satisfactory feeling when opening, although it could take some practice to get the method just right. This box is no longer produced by the Karakuri Creation Group due to the difficulty of manufacturing and subsequent failure rate. Luckily Wil Strijbos had a copy of this box available, otherwise it could've been very difficult for me to complete this collection.

Well, there we have it, the full collection of the Karakuri Small Box series! I managed to get hold of my collection from Wil Strijbos, who has been known to have copies of many of the Karakuri Creation Group's puzzle boxes available relatively regularly. If you are after something specific I definitely recommend you drop him a message. Failing that they are also available from retailers such as Puzzle Master and Sloyd.

Tuesday 3 July 2012

Impossible Cards - First Attempts

After reading Allard's latest blog post about some incredible (and completely impossible) cut and folded playing cards, I was inspired to give this a go for myself. And as luck would have it, I've had nothing to do this evening...

So here are the results of my first few attempts that I will share here:


I won't say anything about these because the pictures really are enough. Try to consider how each of these were made, and then give it a go for yourself!

Please do send me pictures if you come up with a clever design for me to try and solve.

I'm really enjoying making these, so watch this space as hopefully I'll be able to come up with some interesting designs of my own. Until then I'm going to keep practicing on designs like these by Allen Rolfs, Angus Lavery and Ian Rowland.
Related Posts Plugin for WordPress, Blogger...